
How to enjoy pencils colouring? How to make vibrant cards easily? What craft supply will improve your colouring with pencils immediately?
 Как получить удовольствие от раскрашивания цветными карандашами? Как добиться насыщенных оттенков на открытках?
Какое средство моментально улучшит процесс раскрашивания и принесёт отличный результат?
As a card maker keen on colouring I have Copic Sketch and ZIG Clean Color markers in my stash. Recently I started re-discovering colour pencils. After several exercises I understood how wrong I was ignoring pencils for colouring.
Я люблю раскрашивать оттиски, и у моём арсенале есть и спиртовые маркеры Copic Sketch, и акварельные ZIG Clean Color. Но недавно я стала заново открывать для себя цветные карандаши. После нескольких упражнения я поняла, как несправедливо было забыть о цветных карандашах.
Today I am sharing two cards made with similar colouring techniques, sharing one small tip and tell about a device that influenced my attitude to colour pencils strongly.
Сегодня я покажу две открытки с оттисками, раскрашенными карандашами, поделюсь маленькой фишкой и расскажу про инструмент, перевернувший моё отношение к цветным карандашам.
 My initial exercises with colour pencils were not that successful. The first card I have made, I did not share at all. It was rather pale, the colours were muted.
Мои начальные упражнения с цветными карандашами были полным провалом. Самую первую открытку я не показала, а выбросила. Цвета были блеклыми и невнятными.
I felt a bit frustrated. Pencils are cheaper than alcohol and watercolour markers, but still I could spend this money on stamps and dies instead.
Я начала испытывать разочарование. Карандаши дешевле копиков или зигов, но всё же я могла бы потратить эти деньги на новые штампы и ножи.
I started searching for a better paper, reading about blending media for pencils and so on. But the game changer suddenly was a very simple thing.
Я начала задумываться о качестве бумаги. Может, моя не подходила? Стала читать про жидкости для блендинга. Но кардинальная перемена произошла неожиданно, благодаря одному маленькому приспособлению. Но о нём позже.
Firstly let's take a look at the cards to see how vibrant the colours became.
Давайте я сначала покажу яркие, сочные открытки, которые у меня получились.

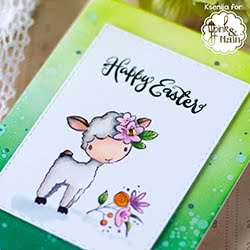
I made both cards using the newly released Forever And Always stamps and coordinating dies sets from ALTENEW.
Для обеих открыток я использовала новинку - штампы и ножи Forever And Always от американской компании ALTENEW.
This stamps set contains two rose bouquet stamps and many sentiments themed love and devotion. I liked how sincere some of the sentiments are.
В наборе два крупных штампа цветочных букетов и много надписей о любви. Некоторые из надписей очень искренние.
This set is perfect for colouring with pencils not just because it contains the outline images, but because there are no lines within the elements. I find clean outline images more suitable for pencil colouring. All that veins, folds or shading lines are good for transparent colouring media, such as watercolours, but are not so good for pencils colouring. Pencils contain oils and cover the drawing surface very well.
Этот набор просто идеально подходит для раскрашивания карандашами. Почему? Потому что это не просто контурный штамп, а штамп без линий внутри элементов. Я поняла, что дополнительные линии на листках и лепестках хороши для прозрачной акварели, но не очень хороши для цветных карандашей, имеющих хорошую кроющую способность.
For my first card I die cut two pieces and stamped the image down in black archival ink. Then I lightly watercoloured the complete impression, without shading. I coloured all roses with a very light pink and all the foliage with a very light green.
Для первой открытки я сделала две вырубки координирующим ножом и два оттиска черными архивными чернилами. Затем я нанесла акварель без переходов оттенков или теней. Просто раскрасила розы бледно-розовым, а листья бледно-зелёным.
Watercolouring helped me to build the first layer of colour and also to distinguish later where the leaves and petals are. Believe me for complicated images this might be tricky sometimes. But I still made one mistake. Wondering, if somebody will find where.
Акварельная прокраска сделала первый цветовой слой и помогла потом различить лепестки и листья. Раскрашивание больших цветочных штампов не всегда так очевидно. Но я всё же допустила ошибку в одном месте. Интересно, кто-нибудь увидит, где?
 On one piece I coloured all the elements with Polychromos pencils, on the other - only the lower rose with two leaves. I fussy cut out this rose.
Одну вырубку я раскрасила полностью карандашами Polychromos, а на второй только нижнюю розу и два листа. Эту розу с листьями я вырезала ножницами.
I masked off the lower right corner of a white card base and blended in Distress ink. Heat set the ink with a heat gun and stamped down the sentiment.
На белой основе открытки я замаскировала нижний правый угол и нанесла Distress чернила. Подсушила чернила феном и сделала оттиск надписи.
To assemble the card I glued the rose bouquet and then popped the second rose up with a foam tape for extra dimension.
Чтобы собрать открытку, я приклейла букет на основу наискосок, а затем с помощью вспененного скотча ранее вырезанную розу.
 I love adding dimension to big floral images and making smaller elements to stand out. I used this enhancement HERE and HERE.
Мне нравится добавлять объём большим цветочным штампам и выделять мелкие элементы. Я писала про это ЗДЕСЬ и ЗДЕСЬ.
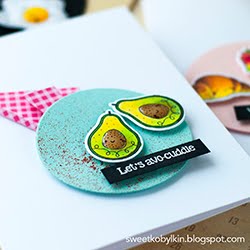
For my second card I die cut and stamped the image in brown archival ink.
Для второй открытки я сделала оттиск коричневыми архивными чернилами.
 It was also lightly coloured with watercolour and then with Polychromos pencils.
Я так же раскрасила оттиск акварелью, а затем карандашами Polychromos.
To add more depth to the card I adhered the coloured image slightly overlapping the sentiment, so that the first line is shaded by lush foliage.
Чтобы добавить глубину открытке, я посадила букет на вспененный скотч и разместила изображение так, чтобы надпись на основе была слегка скрыта листьями.
As I am using cream colour card stock I decided to skip any blending on the background. Soft tone of cream paper makes this gorgeous rose bouquet really standing out.
Так как я использовала кремовый кардсток для основы открытки, я не стала делать блендинг на фоне. Изображение уже хорошо выделяется на кремовом кардстоке.
 Now over to the game changer. What has helped me to improve my colouring drastically? What made me enjoy the process and the final result?
Теперь вернусь к тому, что так сильно изменило моё раскрашивание. Что позволило добиться сочных оттенков? Что облегчило весь процесс раскрашивания и принесло удовлетворение от законченной работы?
This is a Grip Trio Sharpener from Faber-Castell.
Это точилка Grip Trio Sharpener от Faber-Castell
I am not joking. It is ergonomic no-mess tool with three sharpeners for three different size pencil barrels - jumbo, regular and coloured pencil.
Я не шучу. Это эргономичная точилка-контейнер с тремя лезвиями для карандашей разных размеров и типов.

If you enjoy making floral cards, you might want to see these posts on my blog:
Spring Bouquet Any Way You Colour It gives examples of colouring one image with three different media.
Floral Stamp Made To Be Watercoloured features the best stamp for easy watercolouring for any skills level.
1 Stamp Three Ways gives practical tips on boosting creativity
Если вам нравится делать цветочные открытки, для вас будут интересны следующие мои публикации:
Spring Bouquet Any Way You Colour It содержит три примера раскрашивания одного оттиска разными средствами - спиртовыми маркерами, цветными карандашами и акварелью..
Floral Stamp Made To Be Watercoloured демонстрирует штамп самый подходящий для раскрашивания акварелью для кардмейкеров с любыми навыками, включая новичков.
1 Stamp Three Ways рассказывает о простых и эффективных способах развить вдохновение.
If you have not done yet, follow my blog so you can read the future posts as soon as I publish them and be updated about Crafty Sales events and discount codes.
Если Вы ещё не подписались на мой блог на пенельке справа, сделайте это сейчас, чтобы не пропустить новые публикации и своевременно узнавать о распродажах и кодах для скидок, которые я публикую на новой странице Crafty Sales.
Check out Crafty Sales page for the current codes
Simon Says Stamp
 My Favorite Things


Какое средство моментально улучшит процесс раскрашивания и принесёт отличный результат?
As a card maker keen on colouring I have Copic Sketch and ZIG Clean Color markers in my stash. Recently I started re-discovering colour pencils. After several exercises I understood how wrong I was ignoring pencils for colouring.
Я люблю раскрашивать оттиски, и у моём арсенале есть и спиртовые маркеры Copic Sketch, и акварельные ZIG Clean Color. Но недавно я стала заново открывать для себя цветные карандаши. После нескольких упражнения я поняла, как несправедливо было забыть о цветных карандашах.
Today I am sharing two cards made with similar colouring techniques, sharing one small tip and tell about a device that influenced my attitude to colour pencils strongly.
Сегодня я покажу две открытки с оттисками, раскрашенными карандашами, поделюсь маленькой фишкой и расскажу про инструмент, перевернувший моё отношение к цветным карандашам.

Мои начальные упражнения с цветными карандашами были полным провалом. Самую первую открытку я не показала, а выбросила. Цвета были блеклыми и невнятными.
I felt a bit frustrated. Pencils are cheaper than alcohol and watercolour markers, but still I could spend this money on stamps and dies instead.
Я начала испытывать разочарование. Карандаши дешевле копиков или зигов, но всё же я могла бы потратить эти деньги на новые штампы и ножи.
I started searching for a better paper, reading about blending media for pencils and so on. But the game changer suddenly was a very simple thing.
Я начала задумываться о качестве бумаги. Может, моя не подходила? Стала читать про жидкости для блендинга. Но кардинальная перемена произошла неожиданно, благодаря одному маленькому приспособлению. Но о нём позже.
Firstly let's take a look at the cards to see how vibrant the colours became.
Давайте я сначала покажу яркие, сочные открытки, которые у меня получились.

I made both cards using the newly released Forever And Always stamps and coordinating dies sets from ALTENEW.
Для обеих открыток я использовала новинку - штампы и ножи Forever And Always от американской компании ALTENEW.
This stamps set contains two rose bouquet stamps and many sentiments themed love and devotion. I liked how sincere some of the sentiments are.
В наборе два крупных штампа цветочных букетов и много надписей о любви. Некоторые из надписей очень искренние.
This set is perfect for colouring with pencils not just because it contains the outline images, but because there are no lines within the elements. I find clean outline images more suitable for pencil colouring. All that veins, folds or shading lines are good for transparent colouring media, such as watercolours, but are not so good for pencils colouring. Pencils contain oils and cover the drawing surface very well.
Этот набор просто идеально подходит для раскрашивания карандашами. Почему? Потому что это не просто контурный штамп, а штамп без линий внутри элементов. Я поняла, что дополнительные линии на листках и лепестках хороши для прозрачной акварели, но не очень хороши для цветных карандашей, имеющих хорошую кроющую способность.
For my first card I die cut two pieces and stamped the image down in black archival ink. Then I lightly watercoloured the complete impression, without shading. I coloured all roses with a very light pink and all the foliage with a very light green.
Для первой открытки я сделала две вырубки координирующим ножом и два оттиска черными архивными чернилами. Затем я нанесла акварель без переходов оттенков или теней. Просто раскрасила розы бледно-розовым, а листья бледно-зелёным.
Watercolouring helped me to build the first layer of colour and also to distinguish later where the leaves and petals are. Believe me for complicated images this might be tricky sometimes. But I still made one mistake. Wondering, if somebody will find where.
Акварельная прокраска сделала первый цветовой слой и помогла потом различить лепестки и листья. Раскрашивание больших цветочных штампов не всегда так очевидно. Но я всё же допустила ошибку в одном месте. Интересно, кто-нибудь увидит, где?

Одну вырубку я раскрасила полностью карандашами Polychromos, а на второй только нижнюю розу и два листа. Эту розу с листьями я вырезала ножницами.
I masked off the lower right corner of a white card base and blended in Distress ink. Heat set the ink with a heat gun and stamped down the sentiment.
На белой основе открытки я замаскировала нижний правый угол и нанесла Distress чернила. Подсушила чернила феном и сделала оттиск надписи.
To assemble the card I glued the rose bouquet and then popped the second rose up with a foam tape for extra dimension.
Чтобы собрать открытку, я приклейла букет на основу наискосок, а затем с помощью вспененного скотча ранее вырезанную розу.
Мне нравится добавлять объём большим цветочным штампам и выделять мелкие элементы. Я писала про это ЗДЕСЬ и ЗДЕСЬ.
For my second card I die cut and stamped the image in brown archival ink.
Для второй открытки я сделала оттиск коричневыми архивными чернилами.

Я так же раскрасила оттиск акварелью, а затем карандашами Polychromos.
To add more depth to the card I adhered the coloured image slightly overlapping the sentiment, so that the first line is shaded by lush foliage.
Чтобы добавить глубину открытке, я посадила букет на вспененный скотч и разместила изображение так, чтобы надпись на основе была слегка скрыта листьями.
As I am using cream colour card stock I decided to skip any blending on the background. Soft tone of cream paper makes this gorgeous rose bouquet really standing out.
Так как я использовала кремовый кардсток для основы открытки, я не стала делать блендинг на фоне. Изображение уже хорошо выделяется на кремовом кардстоке.
Теперь вернусь к тому, что так сильно изменило моё раскрашивание. Что позволило добиться сочных оттенков? Что облегчило весь процесс раскрашивания и принесло удовлетворение от законченной работы?
This is a Grip Trio Sharpener from Faber-Castell.
Это точилка Grip Trio Sharpener от Faber-Castell
I am not joking. It is ergonomic no-mess tool with three sharpeners for three different size pencil barrels - jumbo, regular and coloured pencil.
Я не шучу. Это эргономичная точилка-контейнер с тремя лезвиями для карандашей разных размеров и типов.

The key word is coloured pencil. This dedicated sharpener makes the tip of a pencil very thin. A pencil sharpened correctly not only helps to colour tiny image details, but also gives more vibrant colour.
Одно из лезвий создано специально для цветных карандашей. Ни одна из моих прекрасных точилок до сих пор не могла заострить кончик так тонко. Я даже использовала мелкую пилку, но результат был не самым хорошим. Острый цветной карандаш не только позволяет великолепно проработать мелкие детали изображения, но и даёт гораздо более яркий оттенок.
Одно из лезвий создано специально для цветных карандашей. Ни одна из моих прекрасных точилок до сих пор не могла заострить кончик так тонко. Я даже использовала мелкую пилку, но результат был не самым хорошим. Острый цветной карандаш не только позволяет великолепно проработать мелкие детали изображения, но и даёт гораздо более яркий оттенок.
If you enjoy making floral cards, you might want to see these posts on my blog:
Spring Bouquet Any Way You Colour It gives examples of colouring one image with three different media.
Floral Stamp Made To Be Watercoloured features the best stamp for easy watercolouring for any skills level.
1 Stamp Three Ways gives practical tips on boosting creativity
Если вам нравится делать цветочные открытки, для вас будут интересны следующие мои публикации:
Spring Bouquet Any Way You Colour It содержит три примера раскрашивания одного оттиска разными средствами - спиртовыми маркерами, цветными карандашами и акварелью..
Floral Stamp Made To Be Watercoloured демонстрирует штамп самый подходящий для раскрашивания акварелью для кардмейкеров с любыми навыками, включая новичков.
1 Stamp Three Ways рассказывает о простых и эффективных способах развить вдохновение.
If you have not done yet, follow my blog so you can read the future posts as soon as I publish them and be updated about Crafty Sales events and discount codes.
Если Вы ещё не подписались на мой блог на пенельке справа, сделайте это сейчас, чтобы не пропустить новые публикации и своевременно узнавать о распродажах и кодах для скидок, которые я публикую на новой странице Crafty Sales.
Check out Crafty Sales page for the current codes
Simon Says Stamp


Compensated affiliate links used. I personally have bought all the below displayed products. This post was not paid or sponsored.
Click on the icons below to go to your preferred online store. If you buy any of these products following my link, I will receive a small commission at no cost for you.
I am grateful to you, if you help me running this blog.


Your cards are beautiful as always! Thanks for sharing the tip !
ReplyDeleteThey are so beautiful Kesenija--Love!
ReplyDeleteI popped over here from the comment you left on my blog, Ksenija. Thanks for sharing your information on coloring with pencils. I recently purchased PolyChromos and am having fun coloring with them but can use all the tips I can get.
ReplyDeleteTwo stunning florals cards ! Your colouring is fabulous and those colours so beautiful! Thanks so much for the tip and the wonderful inspiration! xx
ReplyDeleteThanks for the info
ReplyDeleteso gorgeous and such fab depth of colours you achieved.
ReplyDeletexx Karen